Introduction
One of the major updates that came in Sitecore 9.1 is Sitecore Identity, this blog post will introduce a basic understanding for how it works.
Sitecore Identity usually abbreviated (SI) is a new feature introduced in Sitecore 9.1. SI doesn’t replace the old identity mechanism, but actually builds on top of the current authentication mechanism in 9.0 and uses the Federated Authentication feature to act as an external authentication source. SI is a wrapper built on top of the open source widely accepted IdentityServer4 which itself is an OpenID Connect and OAuth 2.0 framework for ASP.NET Core, it is also deployed as a separate service (as a part of breaking the monolith into micro-services architecture).
IdentityServer4 on it’s own enables many goodies, including Authentication as a Service, Single Sign-on/Sign-out, Access Control for APIs also it can act as a Federation Gateway as well.
How it works
Starting Sitecore 9.1 the default deployment includes and uses the new Sitecore Identity, under the hood SI server uses identityserver-contrib-membership which enables IdentityServer4 use the old ASP.NET 2.0 Membership Database, of course as anything else in Sitecore this is highly customizable and can be overridden and changed to another implementation using dependency injection.
In the world of OAuth and Open ID Connect there are usually 3 moving parts which are the (Client – Identity Server – Resources)

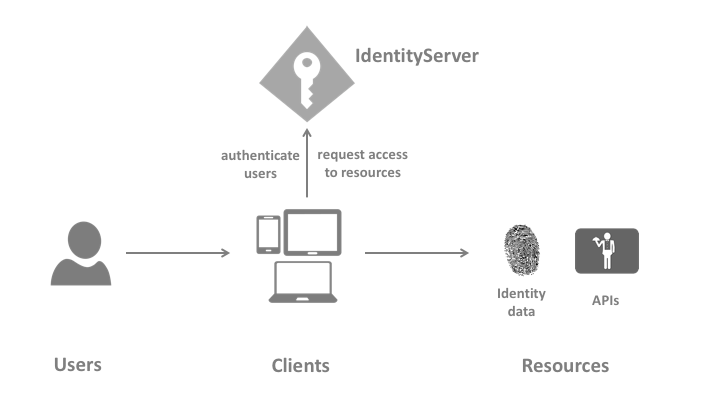
The flow starts from the user, using a client (can be a web app, mobile, bot or even an iot device) and wants to login or request access to a protected resource.
Then the flow is sent to the identity server (which the client is registered in) requesting access to specific resources (can be identity or access to other resources or api, which again is registered in the identity server).
The identity server checks the credentials against the required/configured grant types (more on this later). And then returns to the client caller with the token required for access (which can be stored in a cookie in case or web or used for authorization in case of native) . This is a very simple workflow very brief and skipping a lot of details that might not be relevant to the scope of introduction.
In Sitecore 9.1
So how this is organized in Sitecore, the default implementation comes with an identity server installed which is the token issuer and authority, by default it’s installed at a default url is https://{instanceName}.identityserver. The configuration for the SI server in the Sitecore instance in the \App_Config\Sitecore\Owin.Authentication.IdentityServer\Sitecore.Owin.Authentication.IdentityServer.config configuration file. And that’s where the configuration is added in the instance to make it know about the SI server, specifically in the sitecore/federatedAuthentication/identityProviders node.
On the other hand in the SI server sitecore is configured as a Client, and that is configured in the identity server site root in the path \sitecore\Sitecore.Plugin.IdentityServer\Config\identityServer.xml, in the below image is a snippet of what is actually defined.

Some key values to notice in the configuration, the ClientId (Sitecore) which should be unique for each client app, and the AllowedScopes which tells the identity server which resources can this client ask for.
AllowedGrantTypes this tells identity server how can this client interact with it to acquire tokens, there is a handful of standard grant types out there, and you can combine a few together but some constraints apply for security. For more information check the supported grant types in the identity server.
In this case the Sitecore client is configured to use two grant types, hybrid for user centric operations and client credentials for server to server communication.
In this post I showed the basic out of the box features of Sitecore Identity in 9.1, in the next posts of this series I will show more customizations, how to add a custom client besides the Default Client, how to add your own APIs and protect them using the (SI), also I will show how to add different clients native mobile and chatbots, finally how use the SI as a gateway and enable external custom identity providers like Azure AD or Google.
Leave a Reply